The T-33 aircraft is one of the very first jet aircraft produced and has served its purpose well. The profile of the aircraft with its classic wingtip tanks are easily recognizable . The choice to restore a T-33 ejection seat has been a good one for several reasons. Although both the aircraft and the ejection seats have undergone many changes, they were produced in sufficient numbers that there are still a few flying throughout the world. These seats are relatively simple to restore and do not require sophisticated tools or knowledge to work on them.

The T-33
trainer or "T-Bird" as it came to be know, evolved from the F-80 fighter which also bore the
name Shooting Star. By adding three feet to the fuselage to accommodate a second pilot the world's first jet
trainer was born. When the cockpit grew to two places the six machine guns were removed.
Design
work for the P-80 began in 1943 with the first flight on Jan. 8, 1944. The
F-80, then P-80, was the first jet fighter to enter squadron service in the
Army Air Force and saw action in Korea. As more advanced jets entered service,
the F-80 took on another role - training jet pilots. It was inspired by the German ME-262 and shows
many similar features.
The T-33 is historically significant to
illustrate the evolution of both first generation jet aircraft and ejection
seats. The aircraft has a straight wing
configuration which limited it to subsonic speeds even though its mach meter
wishfully hoped it could achieve mach 1.5
Air compressibility becomes increasingly
important as speeds exceeds 300 mph, and when they are excess of 400 mph it is
the foremost design consideration which requires swept back wings. The whole concept of compressibility was new
and poorly understood in first generation jets. The T-33 was first
developed in 1946 at a time when the attrition rate of jets was sixty-one
aircraft per 100,000 flying hours, and was only reduced to forty in 1948. The ten year average
between 1985 and 1995 is 1.5!

(Picture source unknown.)
The
two-place T-33 jet was designed for training pilots already qualified to fly
propeller-driven aircraft.
Originally
designed the TF-80C, the T-33 made its first flight in March 1948. Production
continued until August 1959 with 5,691 T-33s being built. In addition to its use as a
trainer, the T-33 has been used for such tasks as drone director and target
towing, and in some countries even as a combat aircraft. The RT-33A version,
reconnaissance aircraft produced primarily for use by foreign countries, had a
camera installed in the nose and additional equipment in the rear cockpit.
With the
conclusion of WW II, a new era began to unfold in Naval Aviation - the jet age
- creating new requirements for training aircraft. Navy policy had been to
utilize obsolete fleet aircraft in the advanced training stage but, with the
development of jet fighters, there were no old or obsolete jet fighters
available for training. This led the Navy to acquire three P-80A Shooting Stars
from the Air Force to evaluate the suitability of jet aircraft for operations
aboard carriers and for training.
Testing
began with the delivery of a P-80A to NAS Patuxent River on June 29, 1945. On
November 11, 1946, a P-80A was used for catapult launches, free takeoffs and
arrested landings aboard USS Franklin D. Roosevelt. However, this was not the
first shipboard testing of a jet. On July 21, 1946, an FD-1 (FH-1) Phantom had
operated aboard Roosevelt.
By 1946,
the FJ-1 Fury and FH-1 Phantom were in the fleet and the need for a jet
training aircraft was evident. To fill this gap, the Navy procured 50 Lockheed
P-80s from the Air Force to use as interim familiarization trainers for fighter
pilots until enough Navy jets became available. The P-80 Shooting Stars were
designated TO-1s and were not equipped with arresting hooks or catapult
fittings. They were assigned to VF-6A and VMF-311. They acted as the training
squadrons for pilots and maintenance personnel, providing basic operations and
tactics in jet aircraft. On May 5, 1948, VF-17A, flying the FH-1 Phantom,
became the first Navy jet squadron to become carrier qualified.
Some
T-33s kept two machine guns for gunnery training and some allies used T-33s in
the 1960s, but T-33s continued to fly as currency trainers and test platforms
right into the 1980s.
The T-33
served many missions during its time. It was used to transport pilots to other
bases to pick up tactical aircraft, and afterward led them home on long
over-water flights. The aircraft also provided realistic combat training. While
deployed as the "enemy" during exercises, T-33 pilots flew far out to
sea and returned to penetrate the radar defenses of Okinawa, testing the
interception ability of jets defending the island. The aircraft also served as
a high-speed courier service for the delivery of classified materials, as well
as ferrying aircraft parts to various bases in the Pacific.
The T-33
is one of the world's best known aircraft, having served with the air forces of
more than 20 different countries for almost 40 years. Many are still in use
throughout the world. T-33s have also been built under license in Canada and
Japan. A reconnaissance version, RT-33, was built for export. (reference Wikipedia) Canada was by far the largest licensed
producer of the T-33 with 656 variants designated as the CT-133 for the
RCAF.
Ejection seats of all varieties are
becoming more difficult to find all the time but my advice to anyone planning
to undertake such a project is to find one as complete as possible to start
with. Locating a parts manual which
shows the seat variation which you have is a big help as well. Many of the larger aircraft parts dealers who
may have some parts in stock prefer to deal with part numbers. Parts are more difficult to source as time
goes by but with diligence, determination and patience many can still be
found. I cannot stress the words
diligence and patience enough. The parts
shown on this Blog came from Canada, the United States, Mexico, the U.K.,
Holland, Belgium and Greece and this project has been in progress for four
years. It is wise to check with your
customs to make sure the parts you seek are not in some way restricted. In most cases obtaining parts are the result
of being in the right place at the right time and networking with friends who
know friends who know friends. With the
assistance and advice of a very good friend, I was finally able to locate a
seat which had potential.

A picture is 1000 words. This is a good graphic depiction of what the restoration often felt like.
"The reason I'm doing this is because it feels so good when I quit."
These seats went through many modifications in their service life but they can be divided into two basic types. The first is the ballistic variety and the
later variation the rocket propelled or ROCAT type. The ballistic seat was basically a charge
which propelled the crew out of the cockpit.
At higher speeds there was some concern about clearing the tail of the
aircraft and the weight of the pilot was a major consideration. The ROCAT or rocket powered seat on the other
hand provided the necessary
propulsion and it did not compress the spine and organs as severely when
activated. It provided a steady burn
propulsion rather than a sudden jar. This allowed for ground level ejections at 70 knots.

An illustration showing the leg room for an average sized pilot wearing a backpack chute.
(picture source unknown.)
(picture source unknown.)
Early ejection seat noting minimal knee clearance in foreward cockpit. As a result, all pilots flying the T-33 were measured for clearance - thigh length, rather than height being the deciding factor. A number of pilots who had been flying the T-33 for years found themselves restricted to "rear-seat only."[2]
At first glance, both the ballistic and the ROCAT seats look similar but the ballistic seat is quite a bit simpler and seems to be more
common. The ROCAT seat on the other hand
has some differences which are not immediately evident. The most distinguishing features are the
‘kicker’ strap with its man/seat separator under the bucket (upper right picture) and the shoulder
strap inertia reel in the headrest.(upper right picture).

The total force impose on the body during ejection can be in the neighbor hood of 8 to 12G. With the ballistic catapult, the rate of onset of G. is very high and after the seat has moved only a small distance, the force applied to the pilot is considerable higher than if you had been moving at the same time as the seat. A T-33 cockpit is quite small and the seat cannot be adjusted fore and aft. When the T-33 was flown from the front seat, the pilot often opted to wear a seat chute which would give more room for his knees to clear the windshield frame of the canopy in the event of an ejection. A back pack chute was more commonly used in the rear seat with the survival seat pack.
This seat diagram from an original manual is exactly the same as the one which underwent restoration. (picture source from T-33 manual.)
The total force impose on the body during ejection can be in the neighbor hood of 8 to 12G. With the ballistic catapult, the rate of onset of G. is very high and after the seat has moved only a small distance, the force applied to the pilot is considerable higher than if you had been moving at the same time as the seat. A T-33 cockpit is quite small and the seat cannot be adjusted fore and aft. When the T-33 was flown from the front seat, the pilot often opted to wear a seat chute which would give more room for his knees to clear the windshield frame of the canopy in the event of an ejection. A back pack chute was more commonly used in the rear seat with the survival seat pack.
The ballistic
seat also has a roller bar for the shoulder straps below the headrest. Many of the parts are the same for both seat
types but in undertaking a restoration, it was most important to find a manual
with the correct part numbers for the seat.
That is not an easy task in itself.
The manuals are copy written so part numbers often need to be scavenged
from a variety of sources in bits and pieces. Most commercial sources for parts want part
numbers and life is much easier with those /N numbers. For example, my seat was fitted with an MA-6
shoulder harness retractor. These are
used in many configurations but the differences are significant enough that only
one will fit the seat correctly. The
most useful sources for both information and parts were networking with other
collectors who had similar seats and also by talking to various members of the
Flight Clothing Forum.
My personal preference with any static
restoration is to leave things as they are in their original state.
As long as they do not have parts missing or broken, I try to just clean
pieces so that they are in their best display condition and leave things
alone. Unfortunately in the case of my
seat, its lengthy service and years in forgotten storage had taken a cosmetic
toll. Although the seat did not have
physical damage, many parts had been striped and the paint had pealed and worn and
in many places it had taken on an unpleasant mottled look so I decided to
restore it as close as possible to its last colour. The frame is welded stainless steel while the
bucket and other parts are aluminum.
There was evidence that the seat had been painted several times in its
lifetime. The aluminum had traces of
original primer typically used with fabricated stock aluminum. The
bare aluminum had been prepped with zinc chromate and the seat had been originally
painted olive green. The bottom and
inside of the seat pan had been later painted florescent orange and the last
coat was grey. Each time it had been
painted it appeared that the only parts which were removed were ones which
would not operate properly if they were sprayed over again. Most ballistic seats I have seen were olive
green although there are some Canadian seats which were black. Many of the later ROCAT seats were done in
the medium grey. In refinishing, I
decided to leave the replacement parts in the original colours that were used when
their data plates were applied. My ROCAT seat ended its flying career in
the U.S. Navy so it was finished in those colours.
Regardless of whether sandblasting or paint
stripper is chosen to clean the seat, parts need to be removed to achieve a
smooth finish and to prevent damage to parts in the process. Either way it is not necessary to remove ALL
the paint but it is important that the metal be smooth. I masked any part that I wanted to be left in
their original state for example the labels which were surprisingly in good
condition. I decided to remove the paint
with Circa 1850 Paint Remover rather than to sand blast it. In hind sight I feel that was a good
decision.


Seat
frame and bucket stripped and ready for zinc chromate priming.
The seat bucket and frame were not mass
produced. By using paint stripper, many
unexpected secrets were revealed. In stripping
the paint, I found layout marks on the aluminum to indicate where holes needed
to be cut and drilled. The seat was not
designed to be totally disassembled either.
In places, the aluminum seat was riveted to the stainless steel frame so
that even if all the bolts were removed the seat itself could not be separated
from the bucket frame. Using paint
stripper gave me the opportunity to very faintly discern the word “pilot” and
the tail number of the aircraft “56-?593” on the seat. A bit of research on the tail number and the
process of elimination revealed that it could be 56-1593 which went to the
Military Aircraft Storage and Disposal Center (MASCDC) as TC 893 on November
16, 1969. In order to keep the
provenance of the seat, I reapplied the stenciling as it was when I repainted
it.
Removing parts was a learning experience itself. Many of the bolts have Philips heads and I learned that in order to remove them NOT TURN THE BOLT WITH A SCREWDRIVER! Instead HOLD the bolt with the correct size screwdriver and turn the nut. Other things I’ve learned? ALWAYS put the same bolts back in the pieces they were removed from. The bolts may look the same but they are often have slightly different lengths and belong in specific locations. When it comes to reassembly, the parts go back together in the reverse order to the way they were removed. Even though this may seem obvious it can save a lot of grief and be easily overlooked. Murphy’s Law: No matter how many pictures you take, you probably won’t see the information you need when it comes to reassembly. I wanted to save the original headrest and as a result it required a great deal of care to remove it without damage. I have reattached it with Velcro so that it can be interchanged with an original spare.
Once the seat had been taken down to bare metal I heeded the advice of someone who did an outstanding job of painting a motorcycle with spray cans. He had repainted his bike with very impressive results. His advice was to shake the can well, keep the can upright, spray in short bursts, start the spray slightly before contact with the part and don’t aim for a finished product the first time. Keep coats very light and spray over when the previous coat has set up. BE PATIENT! This process helped to prevent the paint from running. The odd time when it did, I simply let it dry thoroughly and lightly sanded it before I redid it. I used zinc chromate on the aluminum to give it a base coat. Because my seat is the later ROCAT type, I decided to paint it the gray color that was on it last. I went to an automotive paint store and bought automotive primer which turned out to be very close to the original grey of the seat. The colour was so close that I didn’t feel it was necessary to spend the extra money to have the paint on the seat digitally color matched. The flatness of the primer did not quite match the original sheen so I finished the seat with a coat of Krylon, Satin, Clear Transparent spray which was just enough to take away the total flatness of the primer.
Reattaching parts in the reverse order presented
a new set of problems because many were already removed when I obtained the
seat. Many of the parts for this ROCAT
seat are very difficult to locate. Some of
the missing parts in the head of the seat had to be attached before others would
fit. The “seat adjustment jackscrews were
missing and were one of them.
Fortunately they are common to both the ballistic and ROCAT seats and one
would think that they would be easier to locate. Not so.
With a great deal of searching I was able to finally locate one which
was suitable. They too were stripped and
repainted in their original colours.

T-33
seat adjustment jackscrew. This piece is located in the headrest of the ejection seat and is frequently missing when a seat is located for restoration.
Once a project of this type is begun, it is
amazing how even locating such simple things as correct cotter and clevis pins
to install parts can become difficult to source. Once again, friends and connections with like
minded individuals proved more valuable than such conventional sources as
E-bay. Because the number of these
aircraft that are still flying is becoming less and less each year, some
aircraft owners have either stockpiled what they think they will need or
modified their aircraft to accommodate more advanced technology. As a result, parts are becoming more difficult
to find from conventional aircraft suppliers and in many cases they are
removing those that they have from their inventory and because of a small
demand it is not worth it for them to stock them anymore.
The “kicker” strap and it’s inertia reel
are extremely difficult to locate for the ROCAT seat. After a great deal of
time, patience and searching the correct one was finally located.
The MA-6 inertia reel which operates the
shoulder harness for the T-33 is located in the headrest. It too has many variations for use in a
number of aircraft. The basic body is
the same but they have been adapted for a variety of seats. The correct reel for the T-33 has the
shoulder harness release mechanism on the left side whereas some of the other
MA-6 reels have a longer shaft and release from the right side. I had to make one out of two that were different.

Inertia reel for kicker strap ready to be
attached under the seat.
|
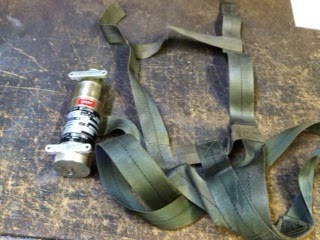
Inertia reel with kicker strap.
|

Correct release when mounted on seat.
|

Variation of MA-6 with long shaft and release on the opposite side.
|
Fortunately many parts for these variations
can be interchanged but care must be
taken when making the conversion. The
first step was to install the correct shoulder harness. This harness is quite different from the
older ballistic type. The ROCAT shoulder harness has a longer strap
which attaches to the reel in the headrest.
Attaching the shoulder harness to the MA-6
is not intuitive. There is a strong
spring in the MA-6 and the release lever on the reel must be used to allow the
shoulder harness to be extended as far as it will go. An Allan key is used to hold it in place
while the harness is installed. The
harness is fed through the drum on the reel and a wedge is used to hold it in
place. When the shoulder harness is held
and the Allan key removed the shoulder harness should retract back into the reel.

Correct ROCAT shoulder harness.
|

Correct shoulder harness for ballistic seat. Note metal attachment. for clevis at the top of the picture.
|

The Allan key holds the spring so that
the shoulder harness can be removed.
|

The ‘wedge’ holds the shoulder harness in place.
|

Shoulder harness and MA-6 reel ready to have release lever switched.
Care needs to be taken to make sure that
the shoulder harness is oriented correctly when installed so that the release
lever will operate from the correct side of the seat. (The large side of the reel needs to be on
the left side of the seat.)
Two Philips head screws which hold the
cover on the MA-6 reel need to be removed to make the changes. The cover needs to be held in place when this
is done because the cover is spring loaded.

Cover removed from MA-6.
|

Release lever removed from ‘donor’ MA-6
|

Release
lever shaft on correct side and cover replaced ready to be installed on seat.

Shoulder reel installed in headbox.

Shoulder reel connected to release mechanism.
I am a firm believer that it is the details
on any project that are noticed the most and this is particularly true with the
T-33 seat. Details take the most time to
research and to locate but they are well worth the effort and make for a
rewarding project when it is completed.
The T-33, ROCAT seat utilized three
initiators to activate the ejection sequence.
Certifying an ejection seat is a costly undertaking due to the fact that
both the chutes and the initiators become time expired and require regular
upgrading. In Canada, many of the T-33’s
which are still airworthy do not have the seats armed but there are companies which
can provide this service. The initiators
are explosive devices and very carefully controlled and regulated. Even when they are time expired they are
rebuilt so the possibility of acquiring an inert example for display is quite remote.
The M32 initiator on this seat is an inert example with French
labels. The catapult and all the initiators
on this seat are inert originals. Excellent
reproduction initiators are sometimes available. It is unlikely that an inert example of the
catapult will be found however the exact specifications are available to
manufacture a reproduction out of plastic tubing.

One
configuration of the M5 series catapults.
Specifications are only slightly different on other variations in the
series.

Live initiators awaiting installation on aircraft.
(source unknow.)
|

Inert M3 initiator left. Reproduction M3
initiator on right.
|
Many of the actual initiators look the same as evident in the difference between the M3 above and the M32A1 diagram below. In most cases the visual difference is in the length. The above reproduction initiator was cast in resin using an original for a mold but tubing fairly close to the correct size can be obtained from a plastic shop in order to make very close representations.

Diagram of a M32A1 initiator showing dimensions to make a reproduction from plastic.
The braided gas lines are the same as the
no.4 fuel lines used by mechanics who build high performance engines and can be
ordered from auto supply dealers either with or without fittings on the ends. The ones purchased at an auto supply dealer are often blue whereas the aviation grade fittings are stainless.
It took four years of searching to find
pictures, diagrams, part lists and the correct parts but with determination and
perseverance the project came together. The
major components of the variations on the T-33 seat are the same. The major difference is the various
components which were mounted on the frame throughout the years. Often a T-33 seat will have "additional" holes visible where older equipment was mounted. An example is the square mounting bracket with
the hole in it seen in the right side of the seat in the pictures below. It is for the inertia reel on the earlier
seats and the bracket was not removed in subsequent variations because it did not interfere
with anything. Below are the before and
after pictures:
    |
    |
Before
and after pictures of T-33 ROCAT seat.

Zero-delay lanyard configuration

SH-2 bail-out bottle as configured for an early T-33 ejection seat. The bottle is positioned in the front of seat cushion of the SA-20 seat parachute and does not have the canvas pouch when installed.
Seat dressed out showing “Remove before flight” flag and H-2 bail out bottle. The bail out bottle has been removed for display purposes. The SA-20 seat chute is complete with the original canopy.

The back of the seat showing the MA-5 catapult which does all the heavy lifting. The M5A1 catapult was fired from the bottom and supplied almost twice the “punch” as the ballistic catapult did. Some of the earlier T-33 rocket catapults were fired from the top.

A rare view of the bottom of a T-33 ROCAT seat showing the rotary actuator (take-up real) which operates the seat/man separator ("kicker strap"). It is possible that the pilot may be unconscious upon ejection. The operation of the kicker strap is timed so that it tightens to throw the pilot away form the seat and automatically pulls the ripcord on the parachute upon egress.
There were only 58 years between the first
manned controlled flight and the first time humans went into space. The T-33 is a significant part of history as one of the very first jet aircraft produced and both first
generation and second generation technology were used. Its lengthy service was largely due to its
durability. One of the features of restoring a T-33 seat
which makes it different from restoring many other ejection seats is that all
the major components are quite visible whereas on newer seats some of the details which illustrate how the seat would have functioned are
not visible and for static display purposes the seat can be restored without an untrained eye noticing that
something is missing. The T-33 ROCAT seat is a good one to restore because historically it is a
second generation seat and it is a good way to learn how an ejection
seat functions. Newer seats function in
much the same way but with much more sophistication, advanced technology and efficiency.
Instructions for Proper Pilot (Canadian)Tie-Down After 1966.
Ensure sea is in the full up position.
Tighten seat pack Airlock
fasteners and tuck excess strap under seat pack cushion.
Attach tie-down straps to
D-rings (two) at rear of bucket and to the negative G-strap ring (one). Tighten straps and attach loose end of
negative G-strap to Velcro hooks.
Route the oxygen hose over
seat armrest, through the loop, and stow on the oxygen stowage plug.
Lock the shoulder harness.
Place shoulder harness
loops on the tongue of the left half of the HBU-12/P lap belt.
Place the parachute arming
key on the tongue of the lap belt with the two nipples facing the right side of
seat and fasten the lap belt. Tighten
lap belt and shoulder harness.
Wrap the radio cord around
the shoulder harness and tie with the lose ends of harness.
Tie loose ends of lap belt
and wrap seat pack lanyard around lap belt and tie or attach to strap DOT
fastener.
Carefully lower seat to
snug up all straps.
At this point in time, an ejection seat of any type is difficult to obtain. I have been told that more than one hundred T-33 seats were used to test modifications made to them in Canada alone. and when aircraft were taken out of service they were stripped of parts before they were decommissioned and sold at public auction. Now none are sold to the public and most end up being shredded and some of the aluminium probably ends up being used to make pop cans. A sad ending for a noble and historical bird. If you want to display your seat as if it were just removed from an aircraft the catapult will have been the first to be removed anyway. Both the ROCAT and the ballistic catapults
are attached to the seat by a single pin which is held in place by two
keepers. The pin for the ram is taken
off the seat by removing the keepers on the pin and tapping the pin out with a
drift from a hole in the head box on the left rail of the seat. (See arrows on picture below.) Penetrating
oil and the use of a “hot wrench” technique were required to remove the pin on
this INERT! ram. If you are fortunate
enough to locate an initiator or catapult MAKE ABSOLUTELY CERTAIN THAT IT HAS BEEN CERTIFIED INERT
BEFORE ATTEMPTING TO WORK ON IT!!


Pin
removal from seat. Note holes indicated
in last picture to assist with removal of pin.


Top of ROCAT catapult. When re-installing the catapult, the tops on both the ROCAT and the ballistic rockets are clearly marked that they are for the T-33A aircraft and how it should be positioned when the pin is inserted.

Bottom
of M5A1 catapult. In order to prevent the occupant in the back seat from the blast of ejection, the ejection sequence is timed so that the back seat egresses slightly before the one in the front.


SA-20
seat chute showing release mechanism (first picture). Note zipper (last picture) which provides
access to H-2 bail out bottle. The SA-20 chute on this seat is complete
with canopy but time expired and was removed from a T-33 in Dominica. The seat cushion has a zippered pouch in the
seat cushion for the bail out bottle which is typical on most SA-20
chutes. (See detail photos. )
The instructions for removing the seat were commonly displayed on a tag either on the back of the seat or on the headrest. Most of the labels on this seat are original however reproductions can be made to the exact specifications. The best source for this is a shop which does engraving for trophies.

Neither the chute nor the rocket were left
attached to the seat when it was removed from the aircraft but for display
purposes both are shown. The rocket is
one of the rare parts to locate and very few are displayed with the seat.
My intent was to make the seat as complete
as possible. However, as with any
project, it will be a work in progress and I am always looking for parts to
make improvements. I intend to build a
1/48 scale T-33 model aircraft to display with the seat. Future plans include restoring a 1953 T-33 ejection seat to display with this one to be able to provide visual
comparisons of both first and second generation ejection seats. The T-33 was one of the few aircraft in which
such a transition has occurred.
The pre-flight external check on theT-33
was straightforward but there were noticeable differences from the earlier traing pilots underwent in propeller powered Harvards.
Undercarriage locks and tip tank pins had to be removed and stowed. A red
stripe around the rear fuselage indicated the location of the engine turbine.
There were warning decals for the ejection seats and canopy jettison - all
features unique to jet aircraft.
The cockpit was compact, exciting and
intimidating with its unfamiliar equipment, instruments and ejection seat.
There were red-guarded switches, red and amber warning lights, and warning
decals generously distributed around the cockpit. The seats and canopy had
their own safety pins to prevent inadvertent ejection or jettisoning. The small
cockpit was quite comfortable for pilots "of average stature" but
taller or heavier pilots found it cramped.
The strap-in procedure was almost a ritual
and it had to be performed correctly and quickly; the instructors had little
patience with students who dawdled, especially in the prairie winter.
Armament switches were on the left rear
console although they were inactive. They were followed by the fuel switches,
throttle, flap lever and temperature control rheostat. On the left wall were
the unique landing lever, aileron booster on/off control, fuel high pressure
cock, oxygen regulator and the inevitable row of circuit breakers. On the right
console were the IFF (Identification Friend or Foe), 12-channel VHF radio,
light controls and switches and the start-control panel. On the side were more
circuit breakers, the seat adjustment switch, a manual canopy crank and a map
case.
Punched-out in a ballistic seat on 30 Aug, '63. Broke right elbow in the process. Have a seat modified into an easy-chair. Would like to know the proper military model number designation of this seat. Brad at brownshoebrad@gmail.com
ReplyDeleteExcellent site and immaculate seat restoration Lorne. I'm an archaeologist working on a T33 crash site and would like your assistance identifying a part I believe is from the ejection seat. Please contact me at gfquigg@gmail.com if you are available and I will send pics. Much obliged.
ReplyDeleteExcellent site and immaculate seat restoration Lorne. I'm an archaeologist working on a T33 crash site and would like your assistance identifying a part I believe is from the ejection seat. Please contact me at gfquigg@gmail.com if you are available and I will send pics. Much obliged.
ReplyDeleteI just bought a T-33 seat and should get it in the mail soon. I noticed the seat I bought is missing the foot rest. I assume all T-33 seats had this?
ReplyDeleteHi David,
DeleteI have two T-33 seats now. One is an American Navy (the one pictured) and the other is Canadian. I also have both the P-80 as well as a T-33 manual and all the variations have the foot rests. They are spring loaded as well.
This comment has been removed by the author.
ReplyDeleteThis comment has been removed by the author.
DeleteI just picked up 2 CT-133 seats...looking for documentation for restoration...any assistance available here? Thanks
ReplyDeleteDon
Would you believe I lived in Las Cruces New Mexico for three years at the age of 22 years old I took a 4-Hour drive to Pima air and space museum I explored several scrap yards around the area I came across a place called Bob airpark this was in 1999 I believe the owner had died from what I remember and there was some people they're just trying to clean the property I had a Dodge neon rental car I really did not have any plans of purchasing anything but I found an ejection seat and there was a bunch of them I asked the guy how much he said give me twenty for the first couple years aren't even know what it went to finally my neighbor told me it came out of the t33 I have had it for 20 years I am now 42 years old and am in the process of refurbishing mine at the top of the seat there's a plate I found a little treasure underneath the plate it had the numbers 53-4944 I did some research on those numbers and found that the plane was sent to I believe it was MASDAC in 1973 if I know now what I knew then I would have bought every ejection seat in that yardI vividly remember a man buying a helicopter mostly stripped out for 250 bucks there was a large propeller Lane next to the T-33 ejection seat that I bought and he told me if I can lift it I can have it of course I couldn't move it in the process of messing around with the seat I actually got the lever to work to release the harness and the harnesses dated 1963 from the inertia reel I believe I found the actual harness for that real on a website called flighthelmet.com but $145 for that part is a lot of money for static display but being that I paid almost nothing for the seat I think I'm going to get it isn't it crazy that every part including the stickers cost more than what I paid for the whole seat wish me luck on my restoration
ReplyDeleteGreat looks,
ReplyDeletei have such sits and am going to restore it, i miss some parts, i believe i will find them. Congratulations again to you on your nice work.
Terihaj
For 10 years I've been going nuts looking for a Pilot-Seat Separator Actuator (bottom of seat) - I can't even find any nomenclature on it. Would you happen to have a part number or NSN number? I'm restoring a seat - saved my life in 1980. Thanks!
ReplyDeleteAfter more than a decade I found some new info on this!!!! The actuator is a Talley Industries P/N 1000 - although there are variant desiganions such as 1000-44, etc. Will update if I get more info.
DeleteFOUND IT!!!! NSN 1377-00-891-6315, Talley Industries P/N 1000-39
DeleteEnd of story - received an inert NOS Talley 1000-39 for my restoration!
DeleteI truly like to read your post. Thank you so much for taking the time to share such nice information.
ReplyDeleteJet engine coffee table
Hi Lorne,
ReplyDeleteWondering if you can help me. My name is Rob and I'm a member of Whistler Search and Rescue. For the last 10 years we have been looking for the ejection seats from a T-33 that crashed in the Callaghan valley near here in 1956. Can you tell me if the survival kit is attached to the crew man, either directly or by tether? I'm pretty sure the seat and crewman are separated quickly after the ejection. I'm wondering if a crewman would have any reason to go looking for the seat? Would it have additional survival gear. E-mail to whistler.sar@telus.net would be great if you can.Thanks in advance.
Rob :-)
Rob, I flew USAF T-33s in Alaska from 1981-1984. The survival gear is attached to the parachute harness - the seat itself has no equipment. You are correct in that the seat is separated from the pilot soon after ejection. In later models of the seat, there is a function that automatically assists. In early versions of the seat, the seat belt automatically releases but the pilot is expected to assist in the separation. I can think of no reason the pilot would seek the seat post ejection.
Delete